Install Cinnamon Desktop 3.0 In Ubuntu 16.04 and 14.04 LTS
Cinnamon is a desktop environment that is based on the GTK+ 3 toolkit. The project was originally started as a fork of the GNOME Shell, i.e. a mere graphical shell, but became its own desktop environment in Cinnamon 2.0. Cinnamon was initially developed by (and for) the Linux Mint distribution, with wider adoption spreading to other distributions over time.
Cinnamon Desktop Environment offers familiar and traditional desktop experience to its users.. and it is , one of the user friendly and easy to use desktop environment for users who came from Windows operating system background..
Now (MAY 2016) Cinnamon 3.0 is out with lot of new features and bug fixes..
Here , I'm going to show you how to install it in Ubuntu 16.04 LTS , Ubuntu 14.04 LTS and its derivative systems..
Once you've executed the above-mentioned commands in the Terminal app and everything is successfully installed, you can enter the Cinnamon session. You can do that by logging out and choosing "Cinnamon" from the login screen, by clicking on the small Ubuntu logo located on the right side of the username.
That's it, you can now enjoy the Cinnamon 3.0 desktop environment on your Ubuntu 16.04 LTS operating system. However, if you decide that Cinnamon is not for you, you'll have to execute the following commands in the Terminal app to remove the Cinnamon 3.0 installation from your Ubuntu OS.
How To Enable/Disable JavaScript In Your Web Browser
JavaScript is a standard programming language that can be included in web pages to provide functionality such as menus, sounds, and other interactive features. By default, Firefox enables the use of JavaScript and requires no additional installation.
Do you have to disable JavaScript, for some reason(see, Why do people disable JavaScript
)?
Here is the step-by-step instructions for disabling JavaScript in your browsers. By the way, Java and JavaScript are two different things, so make sure that you're looking at the correct language.
TIP : If you're a web developer, you are adding JavaScript to your pages, it's a good idea to view your pages with JavaScript disabled, so you can get an idea what users without JavaScript enabled browsers would see.
WARNING : Please note that you may loose some of the web page functionality by disabling JavaScript.
Disable JavaScript In Firefox
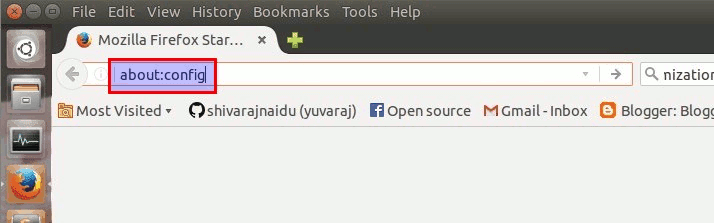
Step 1 :
Type about:config in your location bar and press "ENTER" button..
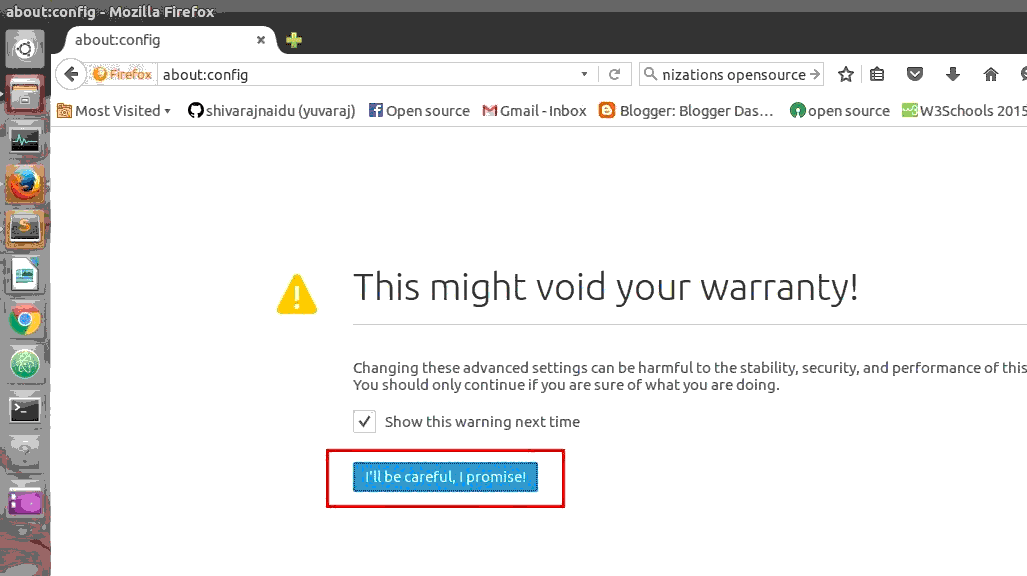
Step 2 :
Now confirm the warning message..
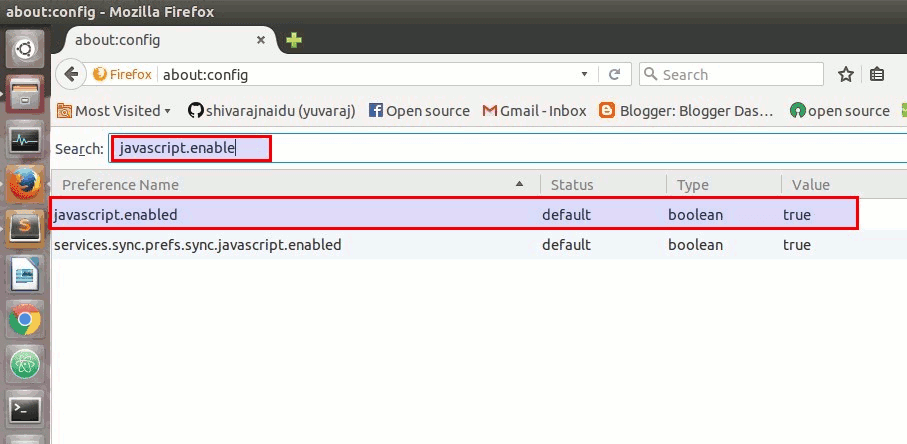
Step 3 :
Now , type "javascript.enabled" in search box..
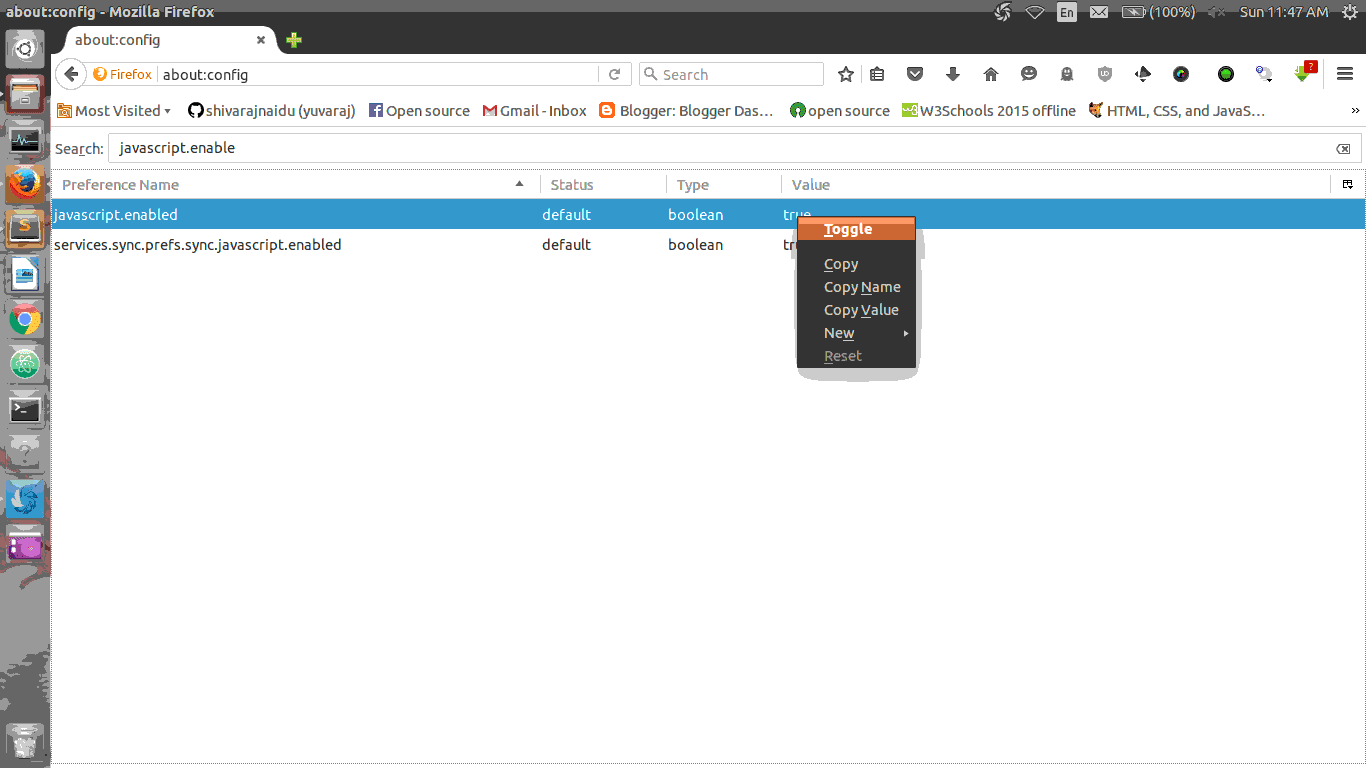
Now change the value of javascript.enabled to false (The default value is "true".. to change it to "false", Right click on it and select toggle option.)
To enable it again, toggle the value back to its default value.. (i.e) set the value as "true"
Disable JavaScript In Google Chrome
Step 1 :
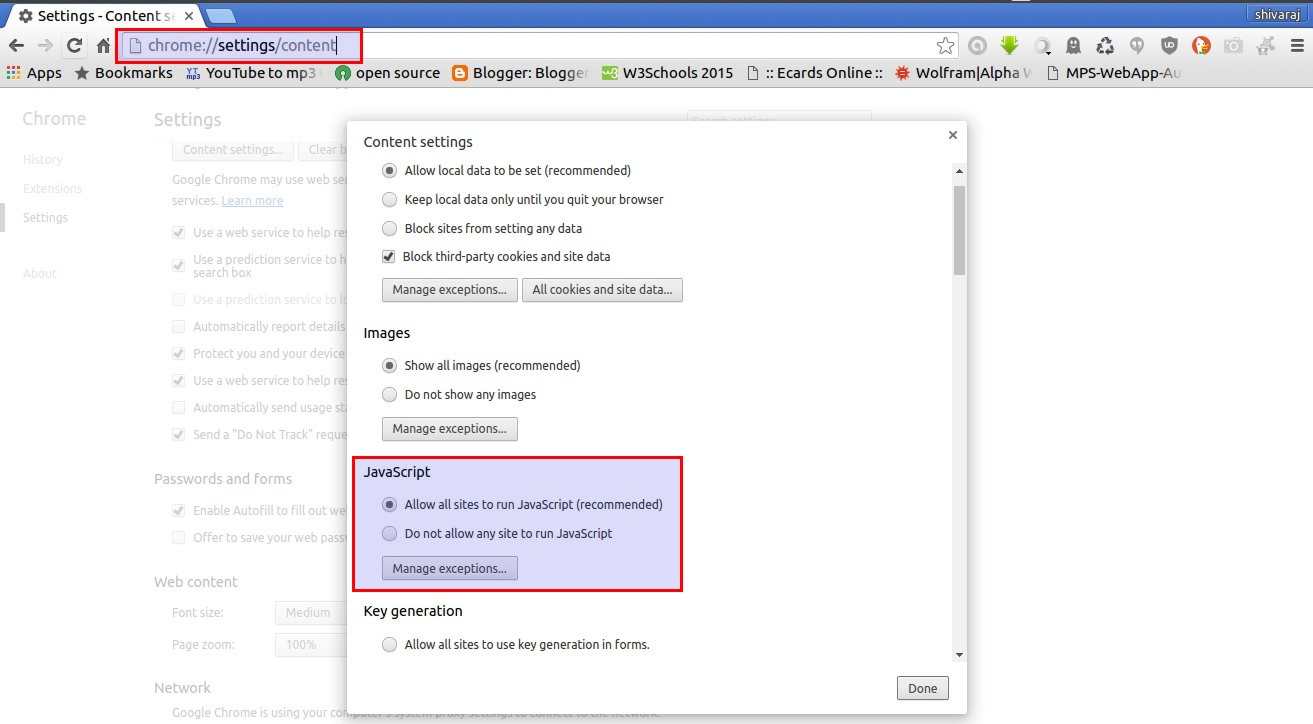
Open Browser Settings and then goto content options(through advace settings).. or (You can also directly access content settings simply , type chrome:settings/content in location bar and press "ENTER" button..) Then look at there for javascript options..
Step 2 :
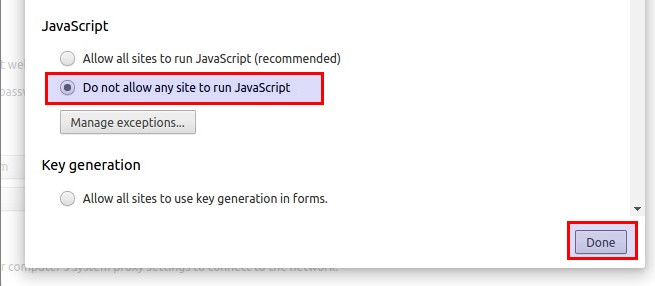
To disable JavaScript in your chrome browser.. Check the radio button named "Do Not Allow Any Site To Run JavaScript"
Disable JavaScript In Opera Browser
Step 1 :
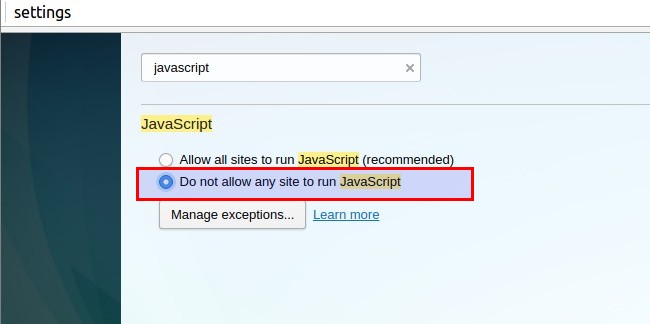
Open Browser Settings (You can also directly access browser settings simply , type chrome:settings in location bar and press "ENTER" button..) and then Type "javascript" in search box present in settings window..
Step 2 :
To disable JavaScript in your Opera web browser.. Check the radio button named "Do Not Allow Any Site To Run JavaScript"
Enable/Disable Backspace as 'Go Back' Shortcut in Firefox
In Firefox on Windows operating system, if you press the `backspace` key, it will take you one page back from current web page, an action that similar to when the both Firefox and IE browser's "Back" button, while `Shift+Backspace` will go forward. The backspace key is mapped to "Back" function in Firefox for Windows is for consistency with Internet Explorer.
On the other hand, Firefox in Linux by default does not map the backspace key to "Go Back" function to improve consistency with other applications running on Linux. Instead, the page will scroll up or down (when pressing Shift+Backspace key together).
The backspace as Back button feature can be easily turned on or off depending on user preference. Thus, Firefox for Windows users can disable the back function mapping to backspace key, and Firefox for Linux can enable the backspace to map to Back function easily, by using the following Firefox preference.
Step 1 :
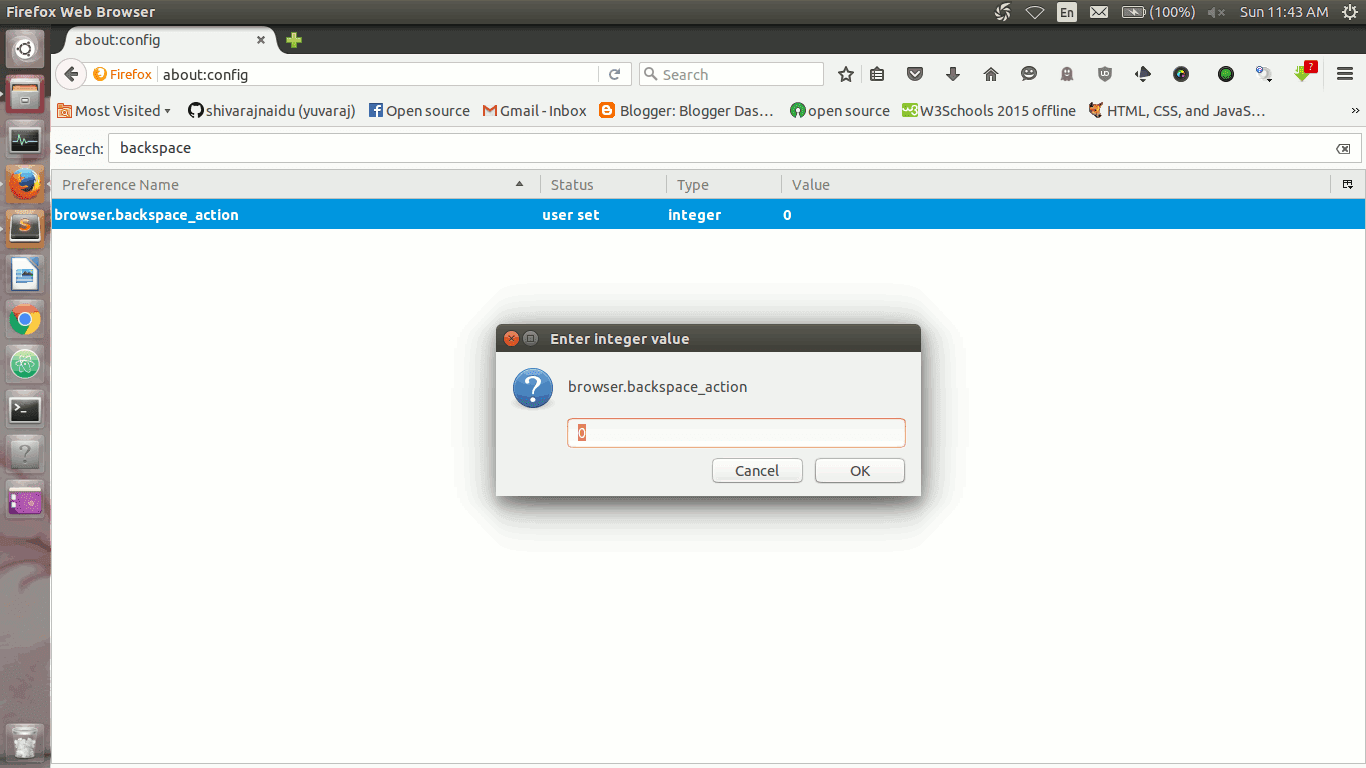
Type about:config and then press Enter key in Firefox Location Box..
And then confirm the warning message.
Step 2 :
Then type "backspace" in search bar and locate the following preference name: browser.backspace_action
Right click on it ,select "Modify" option
and change the browser.backspace_action value to one of the following values (as per your need):
Set value as 0: If you want to set backspace key as 'Go Back' short cut. (Default in Windows)
Set value as 2: If you want disable Backspace as shortcut for 'Go Back' . (Default in Linux)
Animation showing how the date would reset, represented as a signed 32-bit integer (at 03:14:08 UTC on 19 January 2038).
The Year 2038 problem is an issue for computing and data storage situations in which time values are stored or calculated as a signed 32-bit integer, and this number is interpreted as the number of seconds since 00:00:00 UTC on 1 January 1970 ("the epoch"). Such implementations cannot encode times after 03:14:07 UTC on 19 January 2038, a problem similar to but not entirely analogous to the "Y2K problem" (also known as the "Millennium Bug"), in which 2-digit values representing the number of years since 1900 could not encode the year 2000 or later. Most 32-bit Unix-like systems store and manipulate time in this "Unix time" format, so the year 2038 problem is sometimes referred to as the "Unix Millennium Bug" by association.
The year of 2000 which marked a significant date in the computer industry. Those days raised the heat of Y2K - Year 2000 or Millennium bug with all computing systems. If you remember those days, it was supposed to make a huge negative impact if it were not corrected at right time. The bug was fixed properly which saved the computer industry from great failure. A similar problem may occur on all Unix based systems on 19th of January, 2038 if they are not upgraded from 32 bit to 64 bit. Here is a note about what happened in 2000 (Y2K) and what will happen in year 2038.
What is Y2K ? Why was it caused ?
Computers during initial days were made to "think" in two digits for year while counting dates. They were done with intent of keeping the first 19 as constant and changing the last two digits like in 1998, 1999 etc. This was supposed to cause a major problem of resetting everything on some programmed computers as a result of overflow of date from 1999 to 1900. Anyway major nations took it seriously and developers succeeded to fix the problem which resulted in reducing losses on a major part.
What is Year 2038 Problem?
Now, its time for Unix for a Millenium Bug, it is also called as Unix Millenium Bug. This is caused due to the Unix time is computed on a binary format and the counting will be valid from 1970 to 2038. On January 19th 2038 at 03:14:37 this resetting will take place and lead the Unix systems to count the date from 1970. This can be fixed by Unix vendors when they switch from 32 bit to 64 bit versions. Thought it is a long time ahead, it could cause a problem for programs which work for very future dates.
Here is how the date gets reset on year 2038.
Note that the image contains an error that the counting will reset to 1901 which is not the same as in the explanation. One more confusion is the time region that wikipedia says as UTC. Do you think the time zone would matter for any system to reset? I think its that time in any region the computer is set for.
Simply say, it is when the computer software can't interpret the date properly past the year 2038 and it reverts back to December 13, 1901. It will cause the software to fail. It is caused because the system time is a 32-bit integer. It is often referred to as the Unix Milennium Bug.
According to Wikipedia the software will "interpret this number as the number of seconds since 00:00:00 UTC on Thursday, 1 January 1970. The furthest time that can be represented this way is 03:14:07 UTC on Tuesday, 19 January 2038. Times beyond this moment will "wrap around" and be stored internally as a negative number, which these systems will interpret as a date in December 13, 1901 rather than January 19, 2038. This is caused by integer overflow. The counter "runs out" of usable digits, "increments" the sign bit instead, and reports a maximally negative number (continuing to count up, toward zero). This is likely to cause problems for users of these systems due to erroneous calculations."
Will affect you?
Most new computers use a 64-bit system and should not have an issue with the programs that run in 64-bit mode. However, older computers, 64-bit computers that have programs running in 32-bit mode, or embedded systems that use dates to compute or run diagnostics will verly likely be affected by the Unix Milennium Bug (2038 bug). Transportation systems and cars have embedded systems. Basically, anything with a computer embedded in it that uses dates, can suffer from this. Think of all of the objects around us that have a computer chip in it.
So why worry now? It is only 2016.
Any embedded system that is 32-bit and uses future dates 24 years in the future must be fixed by 2016.
What do you do ?, what is the solution ?
There is no universal solution for the Year 2038 Bug. Any change to the definition of the time_t data type would result in code compatibility problems in any application in which date and time representations are dependent on the nature of the signed 32-bit time_t integer. For example, changing time_t to an unsigned 32-bit integer, which would extend the range to the year 2106, would adversely affect programs that store, retrieve, or manipulate dates prior to 1970, as such dates are represented by negative numbers. Increasing the size of the time_t type to 64-bit in an existing system would cause incompatible changes to the layout of structures and the binary interface of functions.
The only real solution is to upgrade your equipment to 64-bit systems before the problem affects you. While your own personal equipment may not cause you any issues, the major concern is everything around you. Transportation systems, streetlgihts, etc...
Starting with NetBSD version 6.0 (released in October 2012), the NetBSD operating system uses a 64-bit time_t for both 32-bit and 64-bit architectures. Applications that were compiled for an older NetBSD release with 32-bit time_t are supported via a binary compatibility layer, but such older applications will still suffer from the Year 2038 problem.
OpenBSD since version 5.5, released in May 2014, also uses a 64-bit time_t for both 32-bit and 64-bit architectures. In contrast to NetBSD, there is no binary compatibility layer. Therefore, applications expecting a 32-bit time_t and applications using anything different from time_t to store time values may break.
Linux uses a 64-bit time_t for 64-bit architectures only; the pure 32-bit ABI is not changed due to backward compatibility. There is ongoing work, mostly for embedded Linux systems, to support 64-bit time_t on 32-bit architectures, too.
The x32 ABI for Linux (which defines an environment for programs with 32-bit addresses but running the processor in 64-bit mode) uses a 64-bit time_t. Since it was a new environment, there was no need for special compatibility precautions.
Alternative proposals have been made (some of which are in use), such as storing either milliseconds or microseconds since an epoch (typically either 1 January 1970 or 1 January 2000) in a signed 64-bit integer, providing a minimum range of 300,000 years. Other proposals for new time representations provide different precisions, ranges, and sizes (almost always wider than 32 bits), as well as solving other related problems, such as the handling of leap seconds. In particular, TAI64 is an implementation of the Temps Atomique International standard, the current international real-time standard for defining a second and frame of reference.
VLC media player (commonly known as VLC) is a portable, free and open-source, cross-platform media player and streaming media server written by the VideoLAN project. VLC is available for desktop operating systems and mobile platforms, such as Windows 10 Mobile, Windows Phone, Android, iPad, iPhone, and iPod Touch. VLC is also available on App stores such as Apple's App Store and Microsoft Windows Windows Store.
VLC media player supports many audio and video compression methods and file formats, including DVD-Video, video CD and streaming protocols. It is able to stream media over computer networks and to transcode multimedia files.
The default distribution of VLC includes a large number of free decoding and encoding libraries, avoiding the need for finding/calibrating proprietary plugins. The libavcodec library from the FFmpeg project provides many of VLC's codecs, but the player mainly uses its own muxers, and demuxers. It also has its own protocol implementations. It also gained distinction as the first player to support playback of encrypted DVDs on Linux and OS X by using the libdvdcss DVD decryption library.
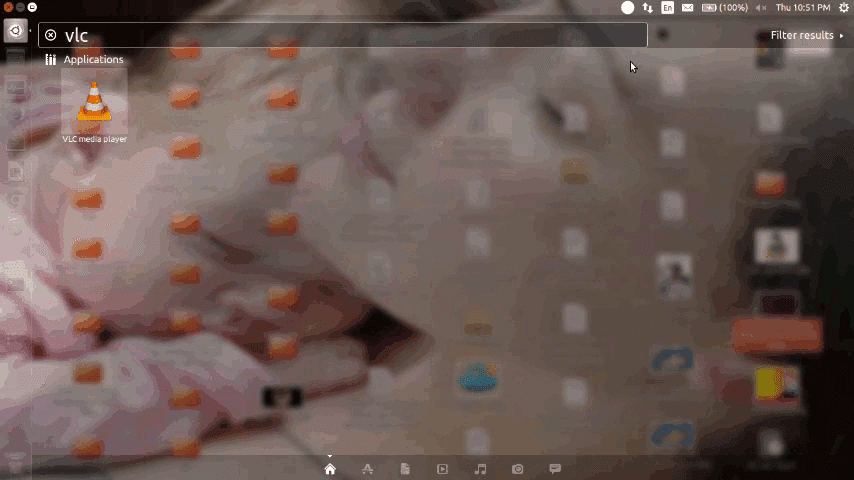
And , Today , I am going show you how to capture/record your Desktop sreen with vlc media player.. Here , is the step by step guide..
Step 1 :
Open VLC media player
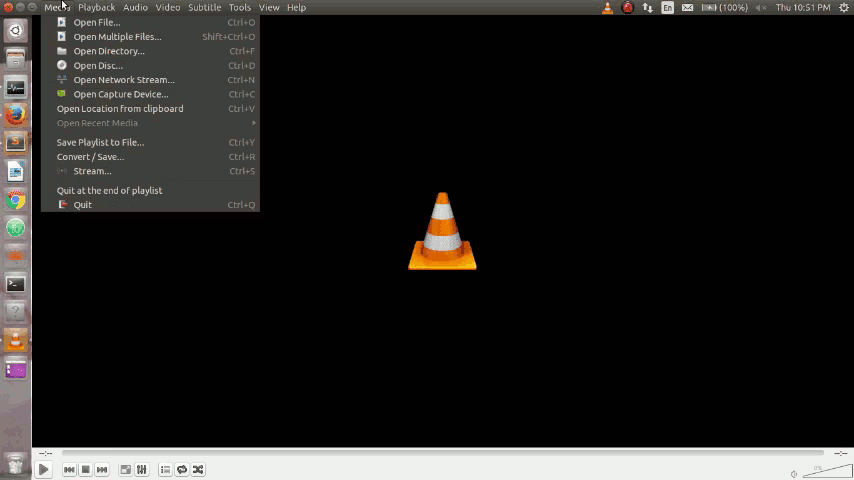
Step 2 :
Then , go to "MEDIA" Open VLC Media player --> "MEDIA"
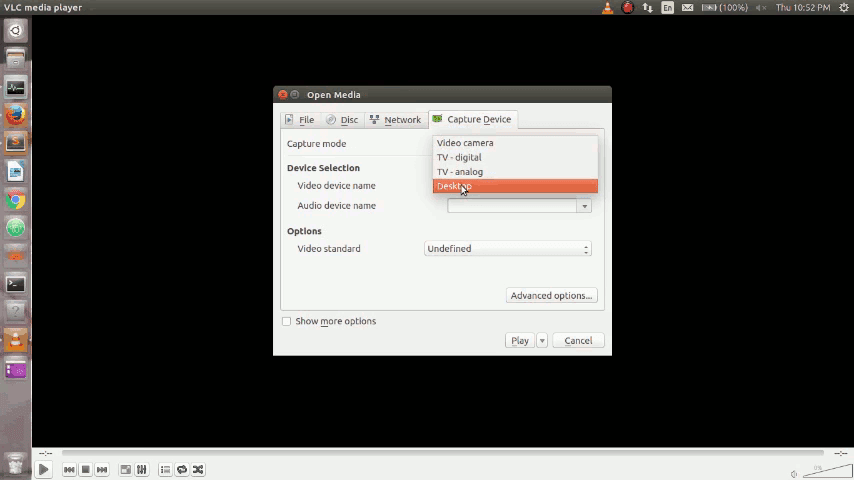
Step 3 :
select "CAPTURE DEVICE" tab.. Open VLC Media player --> "MEDIA" --> "CAPTURE DEVICE"
Step 4 :
Change capture mode to DESKTOP Cpture Mode ==> DESKTOP
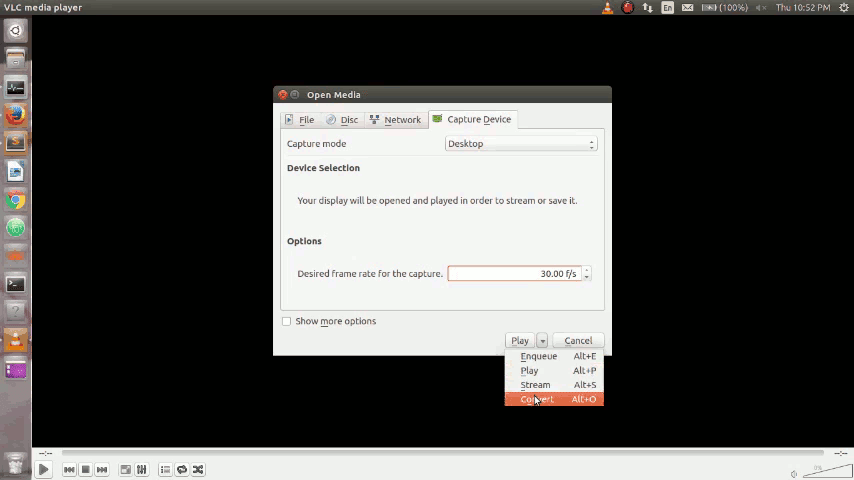
Step 5 :
Change Options to 30 f/s
Step 6 :
Choose CONVERT option instead of play option
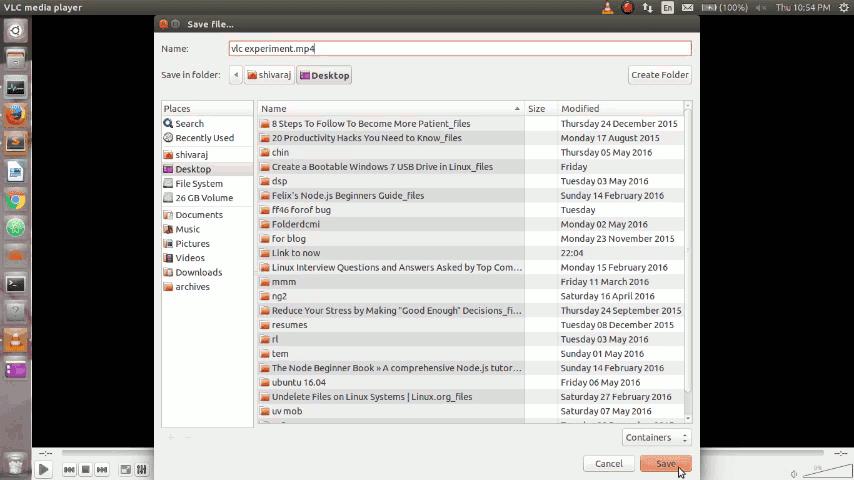
Step 7 :
In the Convert window add the destination file via the BROWSE button then name the file TEST.MPG (VLC does require the extension so the file becomes TEST.MPG rather than just TEST) and click save button If you want to change video format , you can do that throuh profile option. for example if you want to change video to mp4 format .. you can change that in profile options.. and you have to append .mp4 while naming your video file.
Step 8 :
Click START (Optional :Choose the DEINTERLACE option)
Step 9 :
If you have completed recording .. then.. press "STOP Playback" button. that's it..
Friends.. Dont Forget To Share It With Friends.. Have A Nice Day ☻
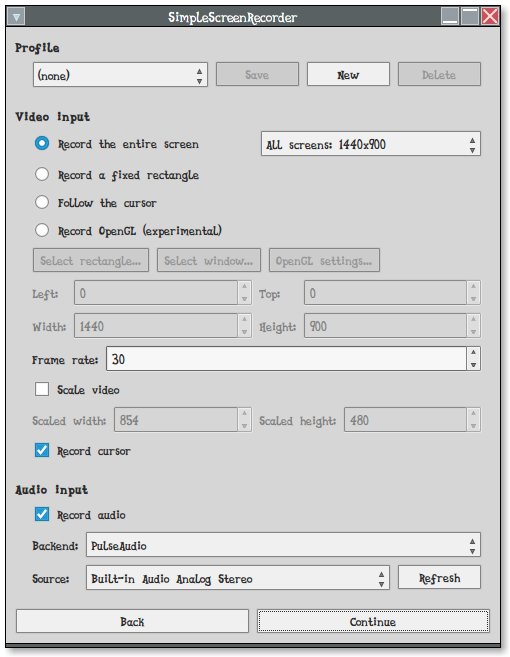
Simple Screen Recorder (SSR) A Feature Rich Screen Recorder Application For Linux
SimpleScreenRecorder is a Qt-based sophisticated opensource screencast software made for Linux operating systems , which was created as a simpler alternative to programs such as ffmpeg/avconv and VLC.
The official website states that... following as ssr's main goal..
SimpleScreenRecorder is a Linux program that I've created to record programs and games. There were already a few programs that could do this, but I wasn't 100% happy with any of them, so I created my own.
My original goal was to create a program that was just really simple to use, but as I was writing it I started adding more and more features, and the result is actually a pretty powerful program. It's 'simple' in the sense that it's easier to use than ffmpeg/avconv or VLC, because it has a straightforward user interface.
Features :
Graphical user interface (Qt-based).
Faster than VLC and ffmpeg/avconv.
Records the entire screen or part of it, or records OpenGL applications directly (similar to Fraps on Windows).
Synchronizes audio and video properly (a common issue with VLC and ffmpeg/avconv).
Reduces the video frame rate if your computer is too slow (rather than using up all your RAM like VLC does).
Fully multithreaded: small delays in any of the components will never block the other components, resulting is smoother video and better performance on computers with multiple processors.
Pause and resume recording at any time (either by clicking a button or by pressing a hotkey).
Shows statistics during recording (file size, bit rate, total recording time, actual frame rate, ...).
Can show a preview during recording, so you don't waste time recording something only to figure out afterwards that some setting was wrong.
Uses libav/ffmpeg libraries for encoding, so it supports many different codecs and file formats (adding more is trivial).
Sensible default settings: no need to change anything if you don't want to.
Tooltips for almost everything: no need to read the documentation to find out what something does.
Installation
Install SSR on Ubuntu And Its Derivatives
There is a PPA available for Ubuntu/Linux Mint and its derivatives.. So we can simply add that to our system and can install it easily..
Run the following command to install SSR in Ubuntu..
You have to enable RPM Fusion repos(EPEL repos too.. for RHEL and CentOS) inorder to install SSR dependencies
Step 1 :
Before installing SSR you have to enable/install RPM Fusion repos , for RHEL/CentOS, EPEL repos.. You Can Find Instructions here.. How To Enable RPM Fusion repos and How To Enable EPEL repos
How To Solve GPG error:http://ppa.launchpad.net In Ubuntu And Its Derivatives
Get:55 http://archive.ubuntu.com trusty-security/multiverse Translation-en [2,570 B]
Get:56 http://archive.ubuntu.com trusty-security/restricted Translation-en [3,206 B]
Get:57 http://archive.ubuntu.com trusty-security/universe Translation-en [75.8 kB]
Hit http://archive.ubuntu.com trusty Release
Hit http://archive.ubuntu.com trusty/main Sources
Hit http://archive.ubuntu.com trusty/restricted Sources
Hit http://archive.ubuntu.com trusty/universe Sources
Hit http://archive.ubuntu.com trusty/universe i386 Packages
Hit http://archive.ubuntu.com trusty/multiverse i386 Packages
Hit http://archive.ubuntu.com trusty/multiverse Translation-en
Hit http://archive.ubuntu.com trusty/restricted Translation-en
Hit http://archive.ubuntu.com trusty/universe Translation-en
Ign http://archive.ubuntu.com trusty/main Translation-en_IN
Ign http://archive.ubuntu.com trusty/multiverse Translation-en_IN
Ign http://archive.ubuntu.com trusty/restricted Translation-en_IN
Ign http://archive.ubuntu.com trusty/universe Translation-en_IN
Fetched 5,467 kB in 1min 5s (82.9 kB/s)
Reading package lists... Done
W: GPG error: http://ppa.launchpad.net trusty InRelease: The following signatures couldn't be verified because the public key is not available: NO_PUBKEY FE1FFCE65CB95493
The above error occured when i ran sudo apt-get update on Ubuntu 14.04. After fetching the required updates it showed me an error at the bottom - W: GPG error: http://ppa.launchpad.net trusty InRelease: The following signatures couldn't be verified because the public key is not available: NO_PUBKEY FE1FFCE65CB95493
Obviously , The solution is , we need to download keys from Ubuntu key server.. Now, see how to do that..
All You have to do to solve this problem is.. open the terminal and run the following command..
Friends , Don't forget to replace the FE1FFCE65CB95493 with the one included in your error message
However , i got timed out error, first time, when i ran this (gpg --keyserver subkeys.pgp.net --recv FE1FFCE65CB95493) .. but when i ran it second time ,it just works fine for me.. Hope it will be usefull.. Share it with your friends..
shivaraj@shivaraj-A14RM0E:~$ gpg --keyserver subkeys.pgp.net --recv FE1FFCE65CB95493
gpg: directory `/home/shivaraj/.gnupg' created
gpg: new configuration file `/home/shivaraj/.gnupg/gpg.conf' created
gpg: WARNING: options in `/home/shivaraj/.gnupg/gpg.conf' are not yet active during this run
gpg: keyring `/home/shivaraj/.gnupg/secring.gpg' created
gpg: keyring `/home/shivaraj/.gnupg/pubring.gpg' created
gpg: requesting key 5CB95493 from hkp server subkeys.pgp.net
gpg: keyserver timed out
gpg: keyserver receive failed: keyserver error
shivaraj@shivaraj-A14RM0E:~$ gpg --keyserver subkeys.pgp.net --recv FE1FFCE65CB95493
gpg: requesting key 5CB95493 from hkp server subkeys.pgp.net
gpg: /home/shivaraj/.gnupg/trustdb.gpg: trustdb created
gpg: key 5CB95493: public key "Launchpad PPA for Vincent Cheng" imported
gpg: Total number processed: 1
gpg: imported: 1 (RSA: 1)
shivaraj@shivaraj-A14RM0E:~$ gpg --export --armor FE1FFCE65CB95493 | sudo apt-key add -
OK
Install Linux Kernel 4.6 On Ubuntu/Linux Mint and Its other Derivative Linux Systems
Linux 4.6 is out now.., brings greater support for ARM based chips
Linus Torvalds this week(15 / MAY / 2016) released the final production for version 4.6 of the Linux kernel.
See What's New In Linux Kernel 4.6.
Now , It's available in Ubuntu's mainline kernel repos.. So that you can easily install it on your Ubuntu/Mint and other Ubuntu derivative systems.. Follow the instructions given below
Warning : The Linux kernel is a critical element of the system. To do the upgrade costs when one of your hardware devices is not working properly, and the new kernel may fix this problem. But at the same time installing a new kernel unnecessarily can lead to undesirable regressions, such as: no network connection, no sound or even the inability to boot the system, so install a new kernel on your own risk.
Method 1 :
In this method , you can simply download the shell script and run it, to install the Linux kernel 4.6.. that downloaed script would take care of rest of the things..
The script needs root privileges to install the kernel.. so please don't forget to provide password while it prompts for root privileges(password)..
If you aren’t happy with the Kernel and wish to uninstall and remove the newly installed Kernel,When the computer boots, the GRUB menu, select your old kernel (pressing shift key while computer start to boot will bring grub menu .. there you can see advance options menu .. enter into that .. Now you can select kernel which you want to boot.. ). After booting the system, remove the new kernel by command below run the following command:
Linux Kernel 4.6 Released With OrangeFS, USB 3.1, SSP Support And More..
Linux 4.6 is out now.., brings greater support for ARM based chips
Linus Torvalds this week(15 / MAY / 2016) released the final production for version 4.6 of the Linux kernel.
Prominent features of Linux kernel 4.6 include the implementation of the OrangeFS distributed file system, support for the USB 3.1 SuperSpeed Plus (SSP) protocol, offering transfer speeds of up to 10Gbps, improvements to the reliability of the Out Of Memory task killer, as well as support for Intel Memory protection keys.
He states his accomplishment in the announcement below:
"It's just as well I didn't cut the rc cycle short, since the last week ended up getting a few more fixes than expected, but nothing in there feels all that odd or out of line. So 4.6 is out there at the normal schedule, and that obviously also means that I'll start doing merge window pull requests for 4.7 starting tomorrow.
Since rc7, there's been small noise all over, with driver fixes being the bulk of it, but there is minor noise all over (perf tooling, networking, filesystems, documentation, some small arch fixes.)
The appended shortlog will give you a feel for what's been going on during the last week. The 4.6 kernel on the whole was a fairly big release - more commits than we've had in a while. But it all felt fairly calm despite that."
Apart from the above mentioned enhancements, version 4.6 of the Linux kernel, offers enhancements for ARM processors and touchscreens.
One of the biggest changes in Linux 4.6 is support for a more ARM based mobile chipsets, which no doubt includes the 14nm FinFET and might we add extremely powerful Qualcomm Snapdragon 820. Additionally, IBM's POWER9 finds its first support, even though the chip is not going to arrive until late 2016.
The foundation also noted the kernel adds performance enhancements and features for 64-bit ARM architecture. The half-precision floating point format for binary numbers is supported as well.
Linux kernel 4.6 ships with Kernel Connection Multiplexor, a new component designed for accelerating application layer protocols, 802.1AE MAC-level encryption (MACsec) support, online inode checker for the OCFS2 file system, support for the BATMAN V protocol, and support for the pNFS SCSI layout.
Other security updates, including kernel memory protection by default on ARMv7+, arm64 and mandatory on x86, and more oulined by Kees Cook, are part of an ongoing effort to create "airbags for the kernel" by preventing bugs from becoming security issues.
How To Install Atom Text Editor On Ubuntu , Fedora and Its Derivative Systems
Atom Text Editor is a nice and feature rich cross platform open source text editor, developed by GitHub. Atom is a desktop application built using web technologies. Atom is based on Electron (formerly known as Atom Shell), a framework that enables cross-platform desktop applications using Chromium and Node.js. It can also be used as an IDE. Its developers call it a "hackable text editor for the 21st Century".
Here, i have listed some features of Atom Text Editor ...
Smart auto completion
File system Browser
Cross-platform editing
Multiple panes
Find and Replace
UI can be customize just with web technologies like CSS, Less.
Built-in package manager
Themes & plug-ins to extend the functionality
Installation :
Now see , How to install Atom Text Editor On Different Linux Systems...
For Ubuntu and its derivatives..
This method also work for debian ,Ubuntu and its derivatives.
Firefox 46.0 Released with the awaiting GTK 3 integration on Linux , more safe JS execution and much faster experience...
Mozilla released Firefox 46 with GTK 3 Integration , More Secure JS execution environment and many fixes to screen readers ,web RTC and many other svg fixes... read what things have changed in FF46..
April 26, 2016, saw the official release of Firefox 46.0, the latest stable release of the popular open-source browser. As firefox is a mainstay of many Linux desktop distros, plenty of users will be keen to see how these changes will impact their favorite browser.
As is often the case, a number of the updates apply fixes to edge cases and obscure bugs that most users won't notice. Nevertheless, these fixes are important. But 46.0 isn't just about obscure bugs nobody cares about, it also brings a number of security and UI improvements that will be welcome to many GNU/Linux users.
This version of Firefox brings GTK3 integration, which the Linux world has been awaiting for some time. GTK3 is the widget toolkit that powers several popular desktop environments, including GNOME, Cinnamon, LXDE and Mate. Incorporating the same toolkit into the browser means tighter integration and better support for customization.
The change is not just cosmetic either. Older machines sometimes struggle to run multiple UI libraries at the same time, and browsers already are notorious memory hogs. Upgrading to 46.0 could make your browsing experience smoother and faster.
Security is a vital issue and one that often clashes with feature-rich applications. This is definitely true when it comes to Web sites and Web applications. Modern sites tend to be very JavaScript heavy, with rich interfaces that offer native-like performance. Unfortunately, allowing JavaScript code to execute in the browser opens a number of security weaknesses that clever cyber-criminals can exploit. And, that's one reason why many security-conscious users choose to deactivate JavaScript.
Mozilla has taken a step toward making JavaScript a more secure platform with a significant change to the way memory is allocated by the SpiderMonkey JavaScript compiler.
Continue Reading Full Articile @ linux journal
Linux Users Can Install or Update Firefox 46 From Their Distributions Official Repositories(Depends upon the Linux Distribution that It may takes one or two days to land New Firefox on Official Repositories.)
To install or Update Firefox on Debian and Ubuntu based systems : sudo apt-get update && sudo apt-get install firefox