Wednesday, September 28, 2016

How To Install And Configure Postfix To Send Mail By Using Gmail As Mail Relay In Ubuntu 16.04 & 14.04

How To Install And Configure Postfix To Send Mail By Using Gmail As Mail Relay In Ubuntu 16.04 & 14.04

Postfix is a cross platform, free and opensource Mail Transfer Agent (MTA) designed to be an alternative to the widely-used Sendmail program. The main aim of Postfix is to be fast, easy to administer, and secure. The outside has a definite Sendmail-ish flavor, but the inside is completely different. Today we are going to see how to install and configure Postfix to send E-mail using gmail as mail relay server... and I'm using Ubuntu 16.04 LTS for this tutorial..(also tested in 14..04)

Installation

You can get Postfix from offical Ubuntu repositories.. So you can install it by running the apt install command..

For Ubuntu 16.04

sudo apt update && sudo apt -y install libsasl2-modules postfix

For Ubuntu 14.04

sudo apt-get update && sudo apt-get -y install libsasl2-modules postfix

Postfix Configuration..

During the installation of Postfix, you will be asked to choose default configuration for postfix...
Select Internet Site...


Enter Fully Qualified Domain Name(FQDN).. for example if you are going to use myuser.example.com then you have to fill example.com for following field..


After installation has completed successfully, proceed following steps to use gmail SMTP server as relayhost.

Configuring Postfix To Use Gmail's SMTP server as Relayhost..

Now we will see how to configure Postfix to send E-mails using gmail as relay host.. To do this we need to edit /etc/postfix/main.cf... open main.cf file in your favorite text editor.. here i am using sublime text(it's my favorite editor )..
See How To Install Sublime Text On Linux

subl /etc/postfix/main.cf

If you want to open with gedit run following the command..

sudo gedit /etc/postfix/main.cf

Then add following lines to the end of main.cf file..

# enable SASL authentication smtp_sasl_auth_enable = yes # disallow methods that allow anonymous authentication. smtp_sasl_security_options = noanonymous # where to find sasl_passwd smtp_sasl_password_maps = hash:/etc/postfix/sasl_passwd # Enable STARTTLS encryption smtp_use_tls = yes # where to find CA certificates smtp_tls_CAfile = /etc/ssl/certs/ca-certificates.crt

And also set relayhost value to [smtp.gmail.com]:587..

relayhost = [smtp.gmail.com]:587

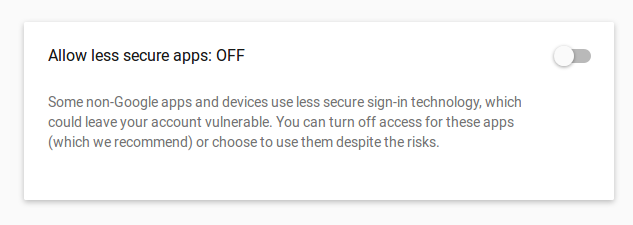
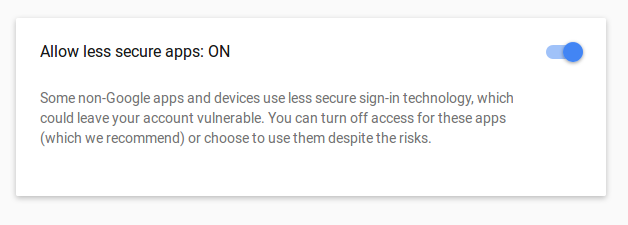
Configure Gmail Username and Password For Authentication :

first you have to create file named sasl_passwd inside /etc/postfix/...

sudo touch /etc/postfix/sasl_passwd

Then open recently created file with your choice of text editor..

sudo gedit /etc/postfix/sasl_passwd

or, if you have sublime text editor... run following..

subl /etc/postfix/sasl_passwd

Now add your smtp server address, port, username and password details in the format shown below..

[smtp relayhost ip or name]:port username:password

For our case (gmail)... following is more suitable example...

[smtp.gmail.com]:587 abcd@gmail.com:mypassword
You have to Turn On Allow less secure apps in-order to use your Postfix MTA work properly with gmail.. To do this go to https://myaccount.google.com/security/lesssecureapps find Allow less secure apps option and Turn On it..


Don't forget to replace with abcd and mypassword with your username and password..

then save and create lookup-table or hash for above file.. by running postmap command..
if you ma any changes

sudo postmap /etc/postfix/sasl_passwd
The above command will create new file sasl_passwd.db in the same location as sasl_passwd file exists..
You should recompile sasl_passwd file.. means you have to run above command whenever you make change in sasl_passwd file...

Restart or Reload Postfix :

Before you use, You should reload or restart Postfix whenever you make changes to main.cf file..

For Ubuntu 16.04

sudo systemctl restart postfix

For Ubuntu 14.04

sudo service postfix restart

Or you can reload postfix with it's own implementation..

sudo postfix reload

Testing Postfix Installation

The easy way to test your postfix installation and configuration is use mail command or sendmail command..

Testing using mail command :

You can use mail command to send mail as follows..

echo message_text | mail -s "subject" Recipient Email Address

For example.. if you want to send mail to myfriendd@outlook.com ... the above command will looks like the following one..

echo Hello | mail -s "Test Mail Subject" shivarajnaidu@outlook.com

Testing using sendmail command :

You can even postfix's implementation of sendmail command..

sendmail shivarajnaidu@outlook.com From: you@example.com Subject: Test Mail Subject Hello .
Note the trailing "." (dot) in sendmail command example.
Usually send mail will consider "." (dot) as end of message

Debugging :

If you didn't receive mail, when you test with above commands.. then see mail.log and mail.err files which are present in /var/log/... From these two files you can point-out the problem and it will be helpful for troubleshooting the problem.


Here is the video for above tutorial...


That's it for now.. If you like don't forget to share it guys.. You can follow us on fb.com/opensourceinside and also subscribe our channel on Youtube..


Thursday, September 22, 2016

Create Password Protected PDF Files Using LibreOffice

Create Password Protected PDF Files Using LibreOffice

Portable Document Format (PDF) is one of the commonly used file formats in our day to day life.. There may be a times, we need to create PDF files from word documents.. Here I am going to show you how to create PDF files from word documents and protect them with passwords (using Libre Office)

Step 1 :

Open your document with LibreOffice which you want to convert into PDF format...

Step 2 :

Then goto File menu and select Export As PDF

Now you will see dialog box like one shown below..

Step 3 :

Then Navigate to tab named Security and Click Set Passwords button..

After Clicked on Set Passwords button you will see set password dialog shown below..
Enter the password you want to set to PDF file.. and click on OK.. and then on Export

Step 4 :

When you click on Export you will get save dialog box like one shown below..
You can save your newely created PDF document on your file system..

Step 5 :

Now try to open newely created PDF document ... It will ask you for password to open the PDF document...

That's it for now ... You can follow us on fb.com/opensourceinside and take a glipse of our youtube channel and don't forget to Subscribe it guys..


Here is the video for above tip...


Tuesday, September 20, 2016

How To Remove Password From Password Protected PDF File Using Google Chrome

How To Remove Password From Password Protected PDF File Using Google Chrome

Portable Document Format (PDF) is one of the commonly used file formats in our day to day life... While it offers grade of security with optional password protection, there are times when we may need unsecured copy of password protected PDF file.
Here, we are going to see, how to achieve the above with the evergreen web browser Google Chrome (of course, we can do the same with Mozilla Firefox )

So, Before we start, you need to have Google Chrome installed in your system... (See, How To Install Google Chrome On Ubuntu Linux).

Step 1 :

Open your password protected PDF file either with Google Chrome or with Mozilla Firefox...

Step 2 :

It will ask you for password ... provide it..
After entering password the PDF will be displayed by your browser..

Step 3 :

Now, Press Ctrl + P on your keyboard or go to options and click on Print option..

After you click on print option you will see dialog like shown below..

Step 4 :

Now click on Save button and Save the new copy of PDF file in somewhere else..
This new copy is password free ....


That's it ... Your new password less copy of PDF file is now ready...

Friends.. If you like this tip.. Do share this small trick on social media with your friends... You can follow more updates on our Facebook page


Here is the video for above tip...


Friday, September 16, 2016

Installing phpMyAdmin in Ubuntu 16.04

Installing phpMyAdmin in Ubuntu 16.04


phpMyAdmin is an open source tool used for the administration/management of MySQL or MariaDB with the use of a web browser. In addition to offering the capability to perform administration tasks such as creating, editing, or deleting databases, and managing users and permissions, phpMyAdmin provides a graphical user interface to do all of these tasks and more. Here, we are going to see how to install, up and run phpMyAdmin on Ubuntu 16.04.

Install phpMyAdmin

Before you start installing phpmyadmin, install PHP, apache and MySql or similar Db..

Then.. Run following command .. to install phpMyadmin on your Ubuntu installation...

sudo apt -y update && sudo apt install phpmyadmin

Continue with typing Y once the installation prompts you with Do you want to continue [Y/n]? Like in the image below.


Now we are prompted with dialog selecting our web server, in our case we are selecting apache2 like shown below.


Select <Yes> as we just want a basic installation like shown below.


Now provide a password for phpMyAdmin to use. So that it can register with the MySQL database itself. (Need not to be the same as the MySQL root user)


Enter in the phpMyAdmin password you created in last step to confirm it as follows.


phpMyAdmin is now installed, but, still we have a few more things to do.

Testing phpMyAdmin

Now we will test phpMyAdmin! Open your favorite Web Browser..
and Navigate to http://localhost/phpmyadmin/

If you end up with a page that looks like one shown below... means, phpMyadmin was installed successfully on your system..


Now lets login, the default username for phpMyAdmin is root and the password is what you have entered while installing phpMyadmin... Enter as follows.

Username: root

Password: What you selected earlier

Select Go to login.

When you log in, you'll see the user interface, which will look something like this:


Hi friends, If you found any issue or typo error, please feel free to report it.. You can report it on our Facebook Page via message (www.fb.com/opensourceinside) .